*******
"When you recover or discover something that nourishes your soul or brings joy,
care enough about yourself to make room for it in your life."
Jean Shinoda Bolen
*******
Showing posts with label Anniversary Cards. Show all posts

November 27, 2013

It's in the Mail #2

I really liked the original of this card.  Many times, I see a card but there aren't any dimensions or instructions, so I just wing it and usually come very close.  Sometimes I don't like the result and sometimes I like my card even better than the original.  The original of this card was created by Joan Robertson.  I am sure she used all Stampin' Up ink.  I used all distress ink because I liked the colors.


My card is made with the elegant butterfly and bitty butterfly punches, together with the Papillon Potpourri stamp set (all SU); and Peeled Paint, Dusty Concord and Broken China distress inks (Tim Holtz/Ranger).  I also used Very Vanilla cardstock (SU), En Francais background stamp (SU) in Going Gray ink (SU), and black cardstock (Michael's).  The twine is linen thread from CTMH.  The sentiment is from "Thinking of You" stamp set (Hero Arts).

November 25, 2013

It's in the Mail! #1

95% of the cards I make must go in the mail, so, that's the name of my new series - It's in the Mail!  I usually don't make cards that can't be mailed - although I enjoy looking at ideas on line.  I don't have a lot of extra money to spend on cards that will sit in my studio because they're too thick to mail.

Sometimes I find it just as challenging trying to reproduce a card I see as coming up with my own ideas. I saw this card and really liked it - then I added my own twist, of course.  Here is the first one and I reproduced it just like the original design by Chiaki Haverstick:


This is the card I made out of the same die, embossing folder, Tea for Two paper (printed from SU's My Digital Studio), and cardstock colors (Very Vanilla and Pacific Point):


As you can see, my sentiment is a bit crooked!

Be aware that if you decide to use this paper - some of the flowers are upside down!  Also, Pay attention to the print around the circles.

September 12, 2013

Vellum Flowers

I saw this card on LeeAnn Greff's blog and had to try it.  I changed out the colors a bit.


I'm not sure how she colored her flowers, so this is how I made the flowers: I embossed the flowers in white on white vellum.  Next, I colored the back of the flowers (just the centers) using SU markers. Starting in the center and using a water brush, I drew the colors to the edge of the flowers.  Next, I die cut the flowers.  I used double-sided tape in just the middle of the flowers.  I figured out I needed to use alot less water for the back of the flowers because the vellum curled easily.

I stamped the leaves and sentiment before embossing the white cardstock.  I also used Sharpie markers to color the pearls for the flower centers.

Supplies:
A2 Card Base - Rich Razzleberry, SU
White Cardstock
White Vellum
Secret Garden stamp set, SU
Secret Garden framelits, SU
Kind & Caring Thoughts stamp set (sentiment), SU
Rich Razzleberry, Marina Mist & Summer Sun markers, SU
Water brush
Small Pearls, Want 2 Stamp
Sharpie Markers
Tuxedo Black ink pad, Momento
Certainly Celery ink pad, SU
Swiss Dots embossing folder, ProvoCraft

September 11, 2013

Ghost Stamping

I saw a video for ghost stamping on Darlene Devries' blog and knew I just had to make it in purple.  Below is a link to her YouTube video for creating this card.

Click here to learn how to ghost stamp

Supplies:
A2 Card base - White CS
Black CS, Michael's
Crumb Cake CS, SU
Secret Garden stamp set, SU
Wetlands stamp set (sentiment), SU
Whisper White Craft ink pad, SU
Dusty Concord Distress ink pad, TH/Ranger
Always Artichoke ink pad, SU
Thin black marker, Sharpie
White marker (flower centers), GellyRoll

September 10, 2013

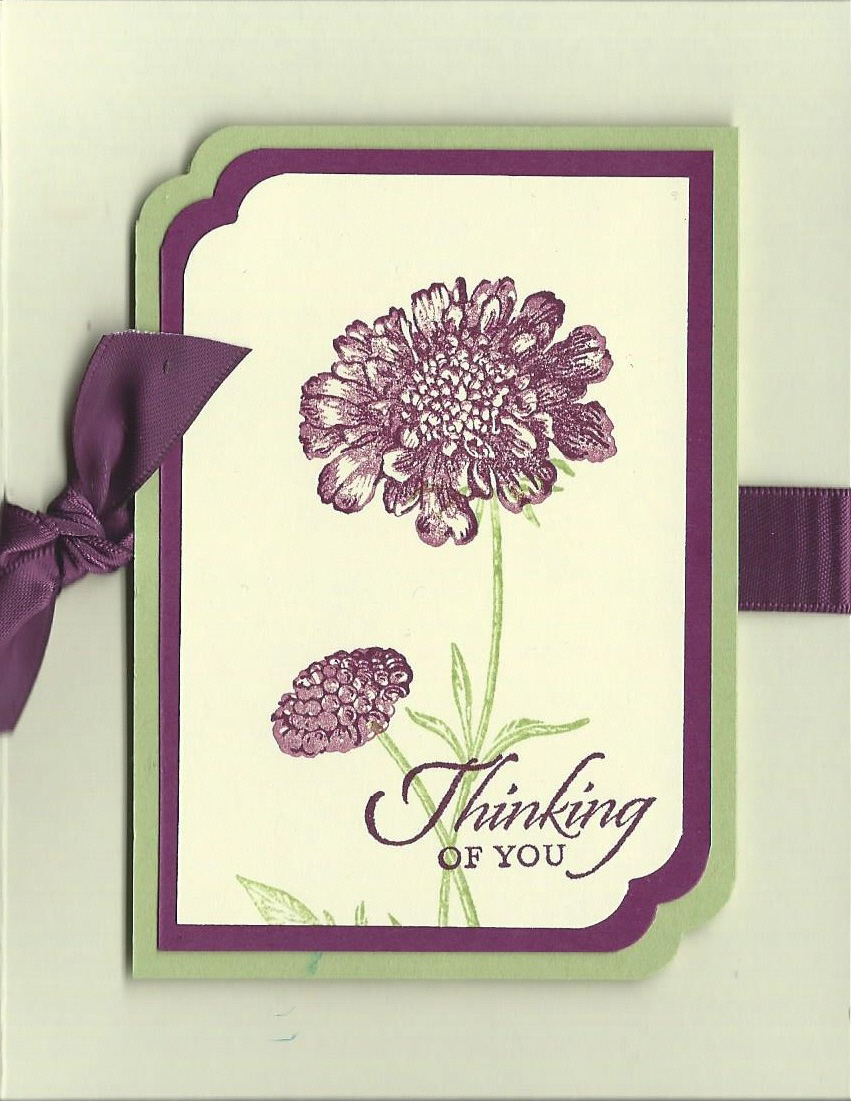
Thinking of You

This is a simple and quick card using the
Field Flowers stamp set from Stampin' Up.


Supplies:
A2 Card Base - Very Vanilla, SU
Cardstock: Rich Razzleberry, Certainly Celery, SU
Field Flowers & Wetlands (sentiment) stamp sets (SU)
Rich Razzleberry Satin Ribbon (SU)
Cloud Corner Chomper (We R Memory Keepers)

September 29, 2012

Masculine Birthday
Version 2

This is version 2 of yesterday's card.  Original design by Laurie Schmidlin (see her card here).

FRONT
INSIDE

Supplies:
See yesterday's post for the rest of the supply list
French Script Paper (Canvas Corp.)
Very Vanilla CS (SU)
Dots on a Line embossing folder (Sizzix)

September 28, 2012

Masculine Birthday
Version 1

I saw Laurie Schmidlin's card (see it here) and really liked the angled front on her card.  This is my first version of her card:
FRONT

INSIDE

Supplies:
Card Base: A2 Black CS (Michael's)
Kraft CS (Michael's)
Striped Paper (Glitz Design)
Distress Stripes embossing folder (ProvoCraft)
Be Happy stamp set (SU) - Front
Terrific Tags stamp set (SU) - Inside
Tea Die Distress ink pad (Tim Holz/Ranger)
Black ink pad
Punches:
Squares: 3/4" (SU), 1-1/4" (SU), 1-3/8" (EKSuccess)
Circles: 1/8", 1/4" (Fiskars), 1/2" (SU)
Tag Punch (SU)
Photo Corner Punch (SU)
Round Tab Punch (SU)

September 20, 2012

Butterflies - Again!

Lately I seem to be on a butterfly binge!  Thank you to Glenda Jones for the original idea for this card.  I saw it and just had to try it.  I used two colors for two looks.  I hope you like them!


Supplies:
A2 Card Base
Very Vanilla, Rich Razzleberry or Not Quite Navy CS (SU)
Elements of Style stamp set (SU)
Sentiment: Elementary Elegance stamp set (SU)
Rich Razzleberry or Not Quite Navy ink pad (SU)
Beautiful Wings embosslit (SU)
Framed Tulips Embossing Folder
Rich Razzleberry or Not Quite Navy 3/8" Taffeta ribbon (SU)
Bisque Liquid Pearls (Ranger)

September 18, 2012

Doily Card

I just got my Delicate Doilies Sizzlit die last night and had to play with it right away.  The original idea for this card is from LeeAnn Greff (Thank you!), and I changed it up a bit to use the doily die and the Edgelit die I've had for a while.  LeeAnn's card was tan, cream and black, and I wanted more color!

Supplies:
Card Base: A2 Very Vanilla (SU)
Certainly Celery CS (SU)
Certainly Celery ink pad (SU)
Espresso Adirondack ink pad (Ranger)
Whimsical Words stamp set (SU)
Flowers #2 Embossing Folder (Sizzix)
Adorning Accents Edgelit Die (SU)
Delicate Doily Sizzlit Die (SU)
Circle: Plantin SchoolBook Cricut cartridge (ProvoCraft)
1/2" Cream Organdy ribbon (JoAnn's)
BowEasy Bow at 1-3/4"

July 1, 2012

Cherish

This is a super simple, fast and easy card.  Just change the sentiment for an anniversary, wedding, or Valentine's Card.


Card base & top layer: Very Vanilla (SU)
Layer: Early Espresso (SU)
(Both layers embossed with Textile embossing folder by ProvoCraft)
1-3/4" Scallop Circle Punch; 1-3/8" Circle Punch; 1-1/4" Circle Punch (SU)
Small circle: Lavender Lace CS (SU)
Espresso Adirondack ink & a brayer used to ink embossing folder for aged look on top layer (Ranger)
Sentiment from Warm Words (SU)
Early Espresso 5/8" Satin Ribbon (SU)

June 28, 2012

Three Flowers

This is a "10 Club" card shared with us by Pam, my local SU Demo.  Her original card is slightly different than the card below - I needed more color!


Card base: White CS
Purple DP: Cloud 9 Designs
Scallop Edge: Adorning Accents Edgelits Die
Sentiment: Teeny Tiny Wishes & Word Window Punch (SU)
Leaves: Certainly Celery CS (SU) & Sizzlits Die (Sizzix)
Flowers: Purple DP (above) & Lavender Lace CS (SU), Spring Blossoms Punch (SU)
1/2" White Sheer Ribbon: JoAnn's
Ink: Elegant Eggplant (SU)
Rhinestones: Michael's

June 27, 2012

Flowers in a Row

This is another stamping adult ed card - this time by Pam.  It's time consuming placing all the little flowers and leaves, but I like the results.


The base card is folded on the top instead of the left edge and is a light gray and embossed with a Sizzix embossing folder.  The pink cardstock for the flowers and scalloped strip is Pink Pirouette (SU) and the leaves are made using the Walk in My Garden Cricut cartridge and Certainly Celery cardstock (SU) and the veins on the leaves were made with a Certainly Celery marker (SU).  The flowers are cut with a punch by EKSuccess.  The pink ribbon has a picot edge and is 1/4" wide (Offray).  I used Perfect Pearls (Ranger) for the flower centers.

June 26, 2012

Butterflies

I am not sure who originally designed this card, but the first time I made this card my friend, Gloria, showed us how in our local stamping adult ed class.  I decided it would be ideal for birthdays.


Thank you TyAnn for the use of your punch and to Gloria for sharing this card with me!

Card base is Always Artichoke (SU), both mats are black and the printed DP is SU.  The olive DP is from a pack of paper I bought years ago at my local Pamida store and sort of looks like a crackle design. I used the Labels Framelits dies (SU) for my layers and the Boho Blossom punch for flowers (not sure of the purple cardstock!).  For the butterflies, I first stamped with one of the flowers from the Mixed Bunch stamp set (SU) with embossing ink, then embossed with white embossing powder.  Then I used the Beautiful Wings Embosslit Die(SU).  I stamped flowers on the center DP in black, but I'm not sure what stamp set they are from (sorry!).  The leaves from cut using a die from Sizzix. 

April 21, 2011

April 19, 2011

Late Night Lattes & Crafts
Episode #11

Silver Doilies

This is a simple and fast card with the added sparkle of Perfect Pearls from Ranger.  Please feel free to leave a comment - I enjoy hearing from you!


Supplies:
Simple Memories stamp set (CTMH)
Elements of Style stamp set (SU)
Black & Silver CS (SU)
White Cardstock (GP)
Pearl colored Perfect Pearls (TH)
Dimensionals or foam tape
 
Supplies

January 23, 2011

Late Night Lattes & Crafts Episode #9

"Watercolor" Card

Here's a super easy technique I learned from Tim Holtz on the Ranger Industries YouTube channel (it's not a new technique, just new to me!).  I recently purchased some of Ranger's Distress Inks and couldn't wait to try out this technique.  The original YouTube video link featuring Tim Holtz is below my video.  Please feel free to leave a comment - I enjoy hearing from you!  (Supply list link is below the video.)


Click HERE for Tim Holtz's original technique

Supplies

December 27, 2010

Late Night Lattes & Crafts #2

First, thank you to all my viewers for the holiday wishes in your comments.  I so enjoy reading all your comments!

I hope you like the card in this episode.  I am sure all of you have stamps you've purchased to make masculine cards, so try one of them on this card.  The card can be used for any number of occasions.  I'm using it for my uncle's birthday card. 

I would love to hear from you, so please, feel free to leave me a comment! The supply list is below the video.


Supplies

December 26, 2010

Pink Birthday

I received the punches I used for this card for Christmas from my sweet husband.  You've really got to try the Martha Stewart "Punch Around the Page" punch sets - they are so much fun!  I simply sponged a paper flower for the card.  The inside of the card says "wishing you a fun filled day."


Supplies

September 24, 2010

Belated Anniversary

This may look like the front of a birthday card, but it's actually an anniversary card.


SUPPLY LIST

September 20, 2010

"Car" Anniversary Card

This card was made for a special request from a friend. I just received the Wedding Solutions cartridge, and this is the first time I've used it.


SUPPLY LIST