*******
"When you recover or discover something that nourishes your soul or brings joy,
care enough about yourself to make room for it in your life."
Jean Shinoda Bolen
*******

September 10, 2013

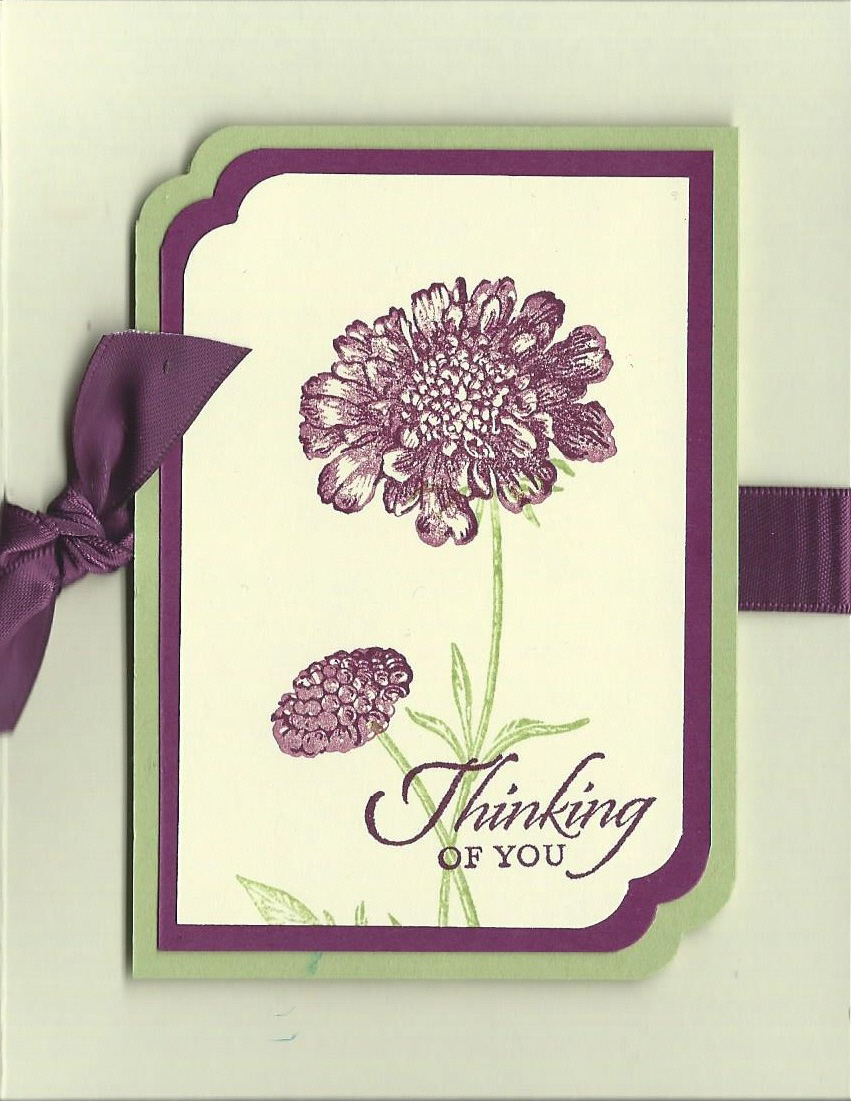
Thinking of You

This is a simple and quick card using the
Field Flowers stamp set from Stampin' Up.


Supplies:
A2 Card Base - Very Vanilla, SU
Cardstock: Rich Razzleberry, Certainly Celery, SU
Field Flowers & Wetlands (sentiment) stamp sets (SU)
Rich Razzleberry Satin Ribbon (SU)
Cloud Corner Chomper (We R Memory Keepers)

September 9, 2013

We Miss You Abby

8-year-old Abby, our Miniature Schnauzer, recently lost her year-long battle with diabetes.  I didn't realize this could happen and it was unexpected.  Abby was always full of life and personality.  I decided I wanted a scrapbook page and I created this page as an 8"x8" in SU's My Digital Studio.  It was hard to choose pictures for the page since Abby was a ham for any camera.


We miss you sweet girl!

March 4, 2013

Wedding
On to the Kids!

There are so many kids in the wedding and attending the wedding that I decided they needed something to take home with them, too!  I didn't use the wedding colors for these party favors, but I think I made enough!  The pillow boxes are for the teenagers, and the milk cartons are for the little kids.


Milk Cartons:  These milk cartons are not made with a die. Click HERE for the video for construction of the 2-part origami-folded milk carton boxes - they're fairly easy and so much fun to make! 

I used white copy paper for the bottoms of the milk cartons (these are made in 4 parts and the copy paper was plenty thick once folded) and a variety of decorative paper (DCWV) for the milk carton tops. I used the rounded tab punch from SU for the name tags.

Pillow Boxes:  The pillow boxes were made using the blackout feature on the Cricut Wedding Solutions cartridge & I inked the edges with distress ink that coordinated with the paper.  I used the new Petite Curly Label punch from SU for the name tags.

 For the pillow boxes, I used white cardstock (Michael's) and a variety of decorative paper (DCWV).

March 3, 2013

Wedding Favors

My step-daughter is getting married and won't be having a reception, so no printed napkins or anything for the wedding guests to take home with them.  I decided to make just a little something for each guest. 

These are the rosette magnets and boxes I made for my dear step-daughter & future step-son:


The wedding colors are royal blue and white, so I printed the sentiment with my MS Word program using the WordArt, and the "A Gift for You" was also printed using MS Word. The banners were actually hand cut to form around the WordArt. I made sure "A Gift for You" fit inside one of the stamps in SU's Four Frames stamp set, then I punched out the stamped image with the coordinating punch. I inked everything with Chipped Sapphire Distress Ink, including the hearts on the rosette (cut with the Cricut and Wedding Solutions cartridge).  The rosette is the larger of the two on the Mini Rosettes Decorative Strip Die (Tim Holtz/Sizzix).


March 2, 2013

Briefcase

Needing something to hold an ornament and card for our grandsons at Christmas, I designed and created briefcases for them.  Here is just one of them:


Supplies:

Night of Navy, Cajon Craze, Marina Mist CS (SU)
Decorative Paper (unknown)
Night of Navy marker for stitching (SU)
Brads for handles (JoAnn's)
White Crochet Thread for tag
Tag Punch (EKSuccess)
1-1/4" Square Punch (SU)
Fastener Tab for closure (TomBow)

March 1, 2013

Purses

With 13 grandkids, I'm always trying to come up with new ideas for a little extra surprise.  We give each of the grandkids a gift card at Christmas and the last two years, an ornament for each of them.  This year, I was working on something to put a card and ornament in for each of them.  This sure saves me gift wrapping time!  Tomorrow I will post the briefcases I designed and create for the grandsons.

These are the purses I designed and created for each of the girls:


I used a variety of cardstock and decorative paper.  Some of the purses have rosette flowers and some have flowers using the Tim Holtz/Sizzix Movers and Shapers Tattered Flowers die.  I like the Movers and Shapers dies because the images are smaller than those on the on the Bigz dies.

Supplies:

White & Daffodil Delight Cardstock (Michael's and SU)
Paper (DCWV)
Ink (for edges & flowers) (SU)
Mini Rosette Die (Tim Holtz/Sizzix)
Tatter Flowers Movers & Shapers Die (Tim Holtz/Sizzix)
1" White Satin Ribbon (Offray)
3/4" Sheer White Ribbon (Offray)
Buttons (from my stash)
Paper flower centers: Candi Dots
Stickles glitter glue (Ranger)
Border Punch (EKSuccess)
Brads (handles) (JoAnn's)
Fastener Tab for closure (TomBow)
February 28, 2013

Party Favors
Boxes & Rosette Magnets

Although recovery from my back surgery is not going as planned (does it ever?), I have been able to get into my craft room for some fun. 

The minister's wife asked for help and I said yes!  She has a daughter's wedding in a few months, a Women's Ministry meeting in April, and a girls' group luncheon in May, all requiring "something!"  Wedding invitations: Done!  Party favors for dinner: Done!  Next project: 35 mini albums for the girls.

Below are the little boxes and rosette magnets I made as party favors (100 of each!).  Original box designed by Carin Curtis.  I stamped and hand cut 300 cowboy boots to fit into the theme of the meeting.  Details are below the pictures. (Sorry for the poor quality of the pictures.)


Supplies:
Kraft & Cream cardstock (Michael's)
Early Espresso cardstock (SU)
Genuine Country stamp set (CTMH) (box border)
Cowboy boot stamp (Ann-ticipations)
Rosette (Mini) Decorative Strip Die (Tim Holtz/Sizzix)
Espresso ink pad (Ranger)
Raffia (Good Times)
Magnets (Darice)

HERE IS A LINK FOR THE BOX CONSTRUCTION.

January 20, 2013

Thank You!

THANK YOU to each and every one of you for your get well wishes and comments! 

I am doing very well.  I saw my surgeon & PA on Wednesday and was told I can start bending and twisting slowly at the waist, which is a huge step forward for me (although it is still a bit painful).  I am still walking as part of my therapy, and that is a big help as well.  The PA also told me that by my birthday in March, I should be able to start riding my bike!

I was told I didn't need to make the 270 mile round-trip to the doctor unless I had issues, so basically, I've been released from further check-ups.  This time of year, it is a challenge driving through Glacier Park to get to the doctor's office (or as I usually say, "over the river and through the woods!").  We've seen alot of snow-packed and icy roads this winter.

I want to send special get well wishes to Chasn Paper - she is having shoulder surgery very soon and I hope she has a speedy recovery!  Many years ago I had reconstructive shoulder surgery and the only advice I have is to take full advantage of any physical therapy the doctor suggests. 

The best part of the doctor visit on Wednesday is that I can craft again - yippee!  I cannot sit for long periods of time, so that's when I do my walking and do my up-and-down the stairs thing.

I hope to be posting some new projects very soon!  Again, THANK YOU!

January 7, 2013

Successful Surgery!

I am now recovering from back surgery and the doctor said that, although it was a bit more involved than originally believed, he thinks it was very successful and I should make a full recovery.  Yippee!  I had surgery at 2:30 pm on Friday and was released to come home at 9 am the next morning.  Part of the quick turn-around was walking 15 minutes every hour at the hospital.  I knew I needed to be up and active to get better and get released!

I admit, yesterday I felt like day two after an extreme exercise day, but today, my back muscles are a whole lot less sore.  I am discovering how difficult it is to not bend or twist at the waist!  I finally feel that the end is in sight and I hope to be crafting soon and that I really will have my life back.  The doctor promised me that by my birthday in March, I will be able to ride my 21-speed bike.  I had no idea a gift that Gary bought me early last summer would be so fun, addicting, and good for me, too!  I cannot wait to ride my bike! 

I found out at my last visit with my neurosurgeon that he's a serious bike rider, too, as are many people in his office.  He told us all about a ride in Idaho and we've decided to make a trip to Idaho and ride the "Trails of Coeur d'Alene," which, according to my surgeon, is 70 miles of paved trails (that used to be railroad tracks) through the beautiful wilderness.  It's nice to have a surgeon who realizes how important "getting my life back" really is to me! 

So, to Dr. Douglas Griffith at the Kalispell Neuroscience and Spine Center and his entire crew, and Val (a wonderful nurse), and the rest of the staff who treated me at the Kalispell Regional Medical Center and Hospital - THANK YOU! 

December 28, 2012

Hanukkah Card

Below is a Hanukkah card I made with inspiration from a Christmas card made by Mary Fish.  She's so creative and always has lots of wonderful ideas!  My friend is Jewish and was so busy with Hanukkah, being a mother, working, and just keeping up with life that I wanted to make sure she had cards for her family, so I made 10 of these cards for her.

(I know, Hanukkah is long past, but I am still messing around with my back problems and I finally have a surgery date - January 4th!)


Supplies:
A2 Card Base - Ballet Blue
Ballet Blue, Elegant Eggplant, Very Vanilla CS (SU)
Designer Paper: K& Company
Festival of Lights stamp set (CTMH)
Background Basics stamp set (SU)
Ballet Blue & Elegant Eggplant ink pads (SU)
Cricles - Plantin SchoolBook & Cricut (ProvoCraft)
Boho Blossom punch (SU)
Pearl (CTMH)
1/4" Elegant Eggplant Grosgrain Ribbon (SU)