*******
"When you recover or discover something that nourishes your soul or brings joy,
care enough about yourself to make room for it in your life."
Jean Shinoda Bolen
*******

November 27, 2013

It's in the Mail #2

I really liked the original of this card.  Many times, I see a card but there aren't any dimensions or instructions, so I just wing it and usually come very close.  Sometimes I don't like the result and sometimes I like my card even better than the original.  The original of this card was created by Joan Robertson.  I am sure she used all Stampin' Up ink.  I used all distress ink because I liked the colors.


My card is made with the elegant butterfly and bitty butterfly punches, together with the Papillon Potpourri stamp set (all SU); and Peeled Paint, Dusty Concord and Broken China distress inks (Tim Holtz/Ranger).  I also used Very Vanilla cardstock (SU), En Francais background stamp (SU) in Going Gray ink (SU), and black cardstock (Michael's).  The twine is linen thread from CTMH.  The sentiment is from "Thinking of You" stamp set (Hero Arts).

November 25, 2013

It's in the Mail! #1

95% of the cards I make must go in the mail, so, that's the name of my new series - It's in the Mail!  I usually don't make cards that can't be mailed - although I enjoy looking at ideas on line.  I don't have a lot of extra money to spend on cards that will sit in my studio because they're too thick to mail.

Sometimes I find it just as challenging trying to reproduce a card I see as coming up with my own ideas. I saw this card and really liked it - then I added my own twist, of course.  Here is the first one and I reproduced it just like the original design by Chiaki Haverstick:


This is the card I made out of the same die, embossing folder, Tea for Two paper (printed from SU's My Digital Studio), and cardstock colors (Very Vanilla and Pacific Point):


As you can see, my sentiment is a bit crooked!

Be aware that if you decide to use this paper - some of the flowers are upside down!  Also, Pay attention to the print around the circles.

September 13, 2013

Embossed Squares

I'm not sure whose original design idea this is, but I saw a similar card at a stamping party.  The squares are embossed with clear embossing power twice.  The photo does not show it, but the squares are very glossy.  I did notice that I needed to use bright paper before embossing because the embossing powder dulled the colors.  I cut the squares after all the embossing was done and cooled.


Supplies:
A2 Card Base - More Mustard, SU
Very Vanilla CS, SU
Elegant Eggplant CS, SU
DSP - Autumn Harvest, My Digital Studio, SU
Pretty Petites stamp set, SU
Fall Season stamp set, unknown (leaf)
Petite Curly Label punch, SU
Clear Embossing Powder
VersaMark Embossing ink pad
More Mustard ink pad, SU
Elegant Eggplant ink pad, SU
Cream/Gold 1/8" satin ribbon, Michael's

September 12, 2013

Vellum Flowers

I saw this card on LeeAnn Greff's blog and had to try it.  I changed out the colors a bit.


I'm not sure how she colored her flowers, so this is how I made the flowers: I embossed the flowers in white on white vellum.  Next, I colored the back of the flowers (just the centers) using SU markers. Starting in the center and using a water brush, I drew the colors to the edge of the flowers.  Next, I die cut the flowers.  I used double-sided tape in just the middle of the flowers.  I figured out I needed to use alot less water for the back of the flowers because the vellum curled easily.

I stamped the leaves and sentiment before embossing the white cardstock.  I also used Sharpie markers to color the pearls for the flower centers.

Supplies:
A2 Card Base - Rich Razzleberry, SU
White Cardstock
White Vellum
Secret Garden stamp set, SU
Secret Garden framelits, SU
Kind & Caring Thoughts stamp set (sentiment), SU
Rich Razzleberry, Marina Mist & Summer Sun markers, SU
Water brush
Small Pearls, Want 2 Stamp
Sharpie Markers
Tuxedo Black ink pad, Momento
Certainly Celery ink pad, SU
Swiss Dots embossing folder, ProvoCraft

September 11, 2013

Ghost Stamping

I saw a video for ghost stamping on Darlene Devries' blog and knew I just had to make it in purple.  Below is a link to her YouTube video for creating this card.

Click here to learn how to ghost stamp

Supplies:
A2 Card base - White CS
Black CS, Michael's
Crumb Cake CS, SU
Secret Garden stamp set, SU
Wetlands stamp set (sentiment), SU
Whisper White Craft ink pad, SU
Dusty Concord Distress ink pad, TH/Ranger
Always Artichoke ink pad, SU
Thin black marker, Sharpie
White marker (flower centers), GellyRoll

September 10, 2013

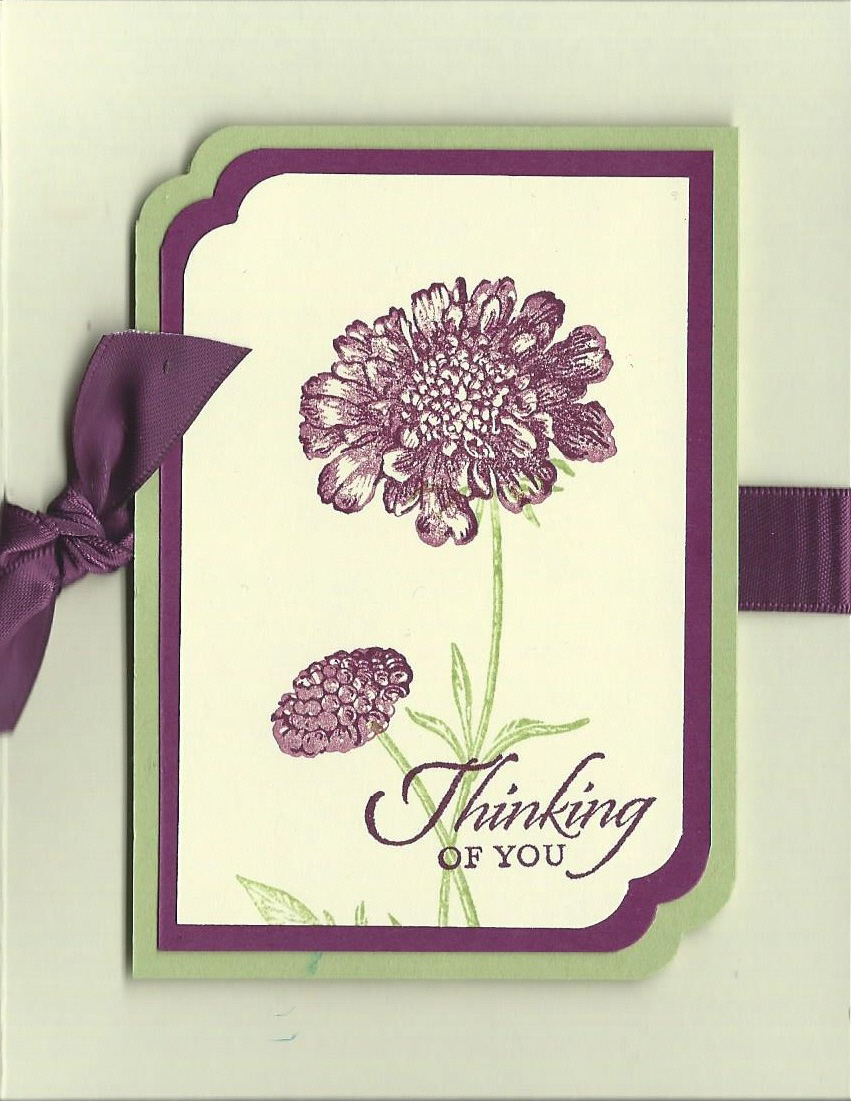
Thinking of You

This is a simple and quick card using the
Field Flowers stamp set from Stampin' Up.


Supplies:
A2 Card Base - Very Vanilla, SU
Cardstock: Rich Razzleberry, Certainly Celery, SU
Field Flowers & Wetlands (sentiment) stamp sets (SU)
Rich Razzleberry Satin Ribbon (SU)
Cloud Corner Chomper (We R Memory Keepers)

September 9, 2013

We Miss You Abby

8-year-old Abby, our Miniature Schnauzer, recently lost her year-long battle with diabetes.  I didn't realize this could happen and it was unexpected.  Abby was always full of life and personality.  I decided I wanted a scrapbook page and I created this page as an 8"x8" in SU's My Digital Studio.  It was hard to choose pictures for the page since Abby was a ham for any camera.


We miss you sweet girl!

March 4, 2013

Wedding
On to the Kids!

There are so many kids in the wedding and attending the wedding that I decided they needed something to take home with them, too!  I didn't use the wedding colors for these party favors, but I think I made enough!  The pillow boxes are for the teenagers, and the milk cartons are for the little kids.


Milk Cartons:  These milk cartons are not made with a die. Click HERE for the video for construction of the 2-part origami-folded milk carton boxes - they're fairly easy and so much fun to make! 

I used white copy paper for the bottoms of the milk cartons (these are made in 4 parts and the copy paper was plenty thick once folded) and a variety of decorative paper (DCWV) for the milk carton tops. I used the rounded tab punch from SU for the name tags.

Pillow Boxes:  The pillow boxes were made using the blackout feature on the Cricut Wedding Solutions cartridge & I inked the edges with distress ink that coordinated with the paper.  I used the new Petite Curly Label punch from SU for the name tags.

 For the pillow boxes, I used white cardstock (Michael's) and a variety of decorative paper (DCWV).

March 3, 2013

Wedding Favors

My step-daughter is getting married and won't be having a reception, so no printed napkins or anything for the wedding guests to take home with them.  I decided to make just a little something for each guest. 

These are the rosette magnets and boxes I made for my dear step-daughter & future step-son:


The wedding colors are royal blue and white, so I printed the sentiment with my MS Word program using the WordArt, and the "A Gift for You" was also printed using MS Word. The banners were actually hand cut to form around the WordArt. I made sure "A Gift for You" fit inside one of the stamps in SU's Four Frames stamp set, then I punched out the stamped image with the coordinating punch. I inked everything with Chipped Sapphire Distress Ink, including the hearts on the rosette (cut with the Cricut and Wedding Solutions cartridge).  The rosette is the larger of the two on the Mini Rosettes Decorative Strip Die (Tim Holtz/Sizzix).


March 2, 2013

Briefcase

Needing something to hold an ornament and card for our grandsons at Christmas, I designed and created briefcases for them.  Here is just one of them:


Supplies:

Night of Navy, Cajon Craze, Marina Mist CS (SU)
Decorative Paper (unknown)
Night of Navy marker for stitching (SU)
Brads for handles (JoAnn's)
White Crochet Thread for tag
Tag Punch (EKSuccess)
1-1/4" Square Punch (SU)
Fastener Tab for closure (TomBow)

March 1, 2013

Purses

With 13 grandkids, I'm always trying to come up with new ideas for a little extra surprise.  We give each of the grandkids a gift card at Christmas and the last two years, an ornament for each of them.  This year, I was working on something to put a card and ornament in for each of them.  This sure saves me gift wrapping time!  Tomorrow I will post the briefcases I designed and create for the grandsons.

These are the purses I designed and created for each of the girls:


I used a variety of cardstock and decorative paper.  Some of the purses have rosette flowers and some have flowers using the Tim Holtz/Sizzix Movers and Shapers Tattered Flowers die.  I like the Movers and Shapers dies because the images are smaller than those on the on the Bigz dies.

Supplies:

White & Daffodil Delight Cardstock (Michael's and SU)
Paper (DCWV)
Ink (for edges & flowers) (SU)
Mini Rosette Die (Tim Holtz/Sizzix)
Tatter Flowers Movers & Shapers Die (Tim Holtz/Sizzix)
1" White Satin Ribbon (Offray)
3/4" Sheer White Ribbon (Offray)
Buttons (from my stash)
Paper flower centers: Candi Dots
Stickles glitter glue (Ranger)
Border Punch (EKSuccess)
Brads (handles) (JoAnn's)
Fastener Tab for closure (TomBow)

February 28, 2013

Party Favors
Boxes & Rosette Magnets

Although recovery from my back surgery is not going as planned (does it ever?), I have been able to get into my craft room for some fun. 

The minister's wife asked for help and I said yes!  She has a daughter's wedding in a few months, a Women's Ministry meeting in April, and a girls' group luncheon in May, all requiring "something!"  Wedding invitations: Done!  Party favors for dinner: Done!  Next project: 35 mini albums for the girls.

Below are the little boxes and rosette magnets I made as party favors (100 of each!).  Original box designed by Carin Curtis.  I stamped and hand cut 300 cowboy boots to fit into the theme of the meeting.  Details are below the pictures. (Sorry for the poor quality of the pictures.)


Supplies:
Kraft & Cream cardstock (Michael's)
Early Espresso cardstock (SU)
Genuine Country stamp set (CTMH) (box border)
Cowboy boot stamp (Ann-ticipations)
Rosette (Mini) Decorative Strip Die (Tim Holtz/Sizzix)
Espresso ink pad (Ranger)
Raffia (Good Times)
Magnets (Darice)

HERE IS A LINK FOR THE BOX CONSTRUCTION.

January 20, 2013

Thank You!

THANK YOU to each and every one of you for your get well wishes and comments! 

I am doing very well.  I saw my surgeon & PA on Wednesday and was told I can start bending and twisting slowly at the waist, which is a huge step forward for me (although it is still a bit painful).  I am still walking as part of my therapy, and that is a big help as well.  The PA also told me that by my birthday in March, I should be able to start riding my bike!

I was told I didn't need to make the 270 mile round-trip to the doctor unless I had issues, so basically, I've been released from further check-ups.  This time of year, it is a challenge driving through Glacier Park to get to the doctor's office (or as I usually say, "over the river and through the woods!").  We've seen alot of snow-packed and icy roads this winter.

I want to send special get well wishes to Chasn Paper - she is having shoulder surgery very soon and I hope she has a speedy recovery!  Many years ago I had reconstructive shoulder surgery and the only advice I have is to take full advantage of any physical therapy the doctor suggests. 

The best part of the doctor visit on Wednesday is that I can craft again - yippee!  I cannot sit for long periods of time, so that's when I do my walking and do my up-and-down the stairs thing.

I hope to be posting some new projects very soon!  Again, THANK YOU!

January 7, 2013

Successful Surgery!

I am now recovering from back surgery and the doctor said that, although it was a bit more involved than originally believed, he thinks it was very successful and I should make a full recovery.  Yippee!  I had surgery at 2:30 pm on Friday and was released to come home at 9 am the next morning.  Part of the quick turn-around was walking 15 minutes every hour at the hospital.  I knew I needed to be up and active to get better and get released!

I admit, yesterday I felt like day two after an extreme exercise day, but today, my back muscles are a whole lot less sore.  I am discovering how difficult it is to not bend or twist at the waist!  I finally feel that the end is in sight and I hope to be crafting soon and that I really will have my life back.  The doctor promised me that by my birthday in March, I will be able to ride my 21-speed bike.  I had no idea a gift that Gary bought me early last summer would be so fun, addicting, and good for me, too!  I cannot wait to ride my bike! 

I found out at my last visit with my neurosurgeon that he's a serious bike rider, too, as are many people in his office.  He told us all about a ride in Idaho and we've decided to make a trip to Idaho and ride the "Trails of Coeur d'Alene," which, according to my surgeon, is 70 miles of paved trails (that used to be railroad tracks) through the beautiful wilderness.  It's nice to have a surgeon who realizes how important "getting my life back" really is to me! 

So, to Dr. Douglas Griffith at the Kalispell Neuroscience and Spine Center and his entire crew, and Val (a wonderful nurse), and the rest of the staff who treated me at the Kalispell Regional Medical Center and Hospital - THANK YOU! 

December 28, 2012

Hanukkah Card

Below is a Hanukkah card I made with inspiration from a Christmas card made by Mary Fish.  She's so creative and always has lots of wonderful ideas!  My friend is Jewish and was so busy with Hanukkah, being a mother, working, and just keeping up with life that I wanted to make sure she had cards for her family, so I made 10 of these cards for her.

(I know, Hanukkah is long past, but I am still messing around with my back problems and I finally have a surgery date - January 4th!)


Supplies:
A2 Card Base - Ballet Blue
Ballet Blue, Elegant Eggplant, Very Vanilla CS (SU)
Designer Paper: K& Company
Festival of Lights stamp set (CTMH)
Background Basics stamp set (SU)
Ballet Blue & Elegant Eggplant ink pads (SU)
Cricles - Plantin SchoolBook & Cricut (ProvoCraft)
Boho Blossom punch (SU)
Pearl (CTMH)
1/4" Elegant Eggplant Grosgrain Ribbon (SU)

December 11, 2012

Rosette Snowman

My back is still giving me major fits and I'm still not scheduled for surgery.  This is the only thing I've made recently and it took me many days to put together since I can't sit for long periods of time! 

I found the pattern for the snowman HERE at the Archiver's website.  It's not as hard as it looks!  I spent more time trying to quill strips bigger then 1/4" than making the actual snowman!  The photo doesn't show it, but the entire snowman is covered in fairy dust glitter (JoAnn's)!!!  See changes and additions I made to the pattern below the photo.


Changes to pattern: 

First, for the actual snowman, I used 11" strips of white cardstock rather than  the 12" strips because I always have an abundance of 8-1/2" x 11" cardstock!  I also used 2-1/2" circles of cardstock for the larger rosettes instead of the 1-3/8" circles in the pattern on both sides of the rosette.  the larger cirlces made the rosettes much more stable.  I used wide Scor-tape to attached the circles.  Before attaching the second circle on the rosette, I used hot glue in the centers of the rosettes.  (If you don't have a 2-1/2" circle punch or a Cricut to cut the circles, just use something like a pint canning jar and trace circles.)  I also added 2 circles of cardstock between each rosette to add space between rosettes that were similar in size.

At the top of his head, I added a 1-3/4" rosette because it was too much of a ridge. 

I also made a much large pipe.  I used a 3/4" strip of craft cardstock and sponges it with Vintage photo distress ink (Ranger/Tim Holtz), rolled it and then pull it out just like his carrot nose.  Then I used the original piece for the pipe and glued a 3/4" strip around it for a higher bowl for the pipe.  Again, I sponge Vintage Photo distress ink on the bowl.

I also used two 3" circles of black cardstock and a 1" strip to make the brim of the hat.  Score 3/8" along both long edges of the 1" strip and cut triangles out of the 3/8" edges.  Fold on the score lines.  apply glue and wrap along outer edges of the large cardstock circles.  tada!  You have a hat brim!  I used hot glue to attached the cylinder to the brim (I used the measurement for the cylinder in the directions) and also to attach the top of the hat (1-7/8" circle of black cardstock) to the cylinder.  I then added three little stars made with the merry minis punch (SU) & gold embossing powder.  I also used a piece of gold plastic canvas cord (Darice) for the hat decoration. 

Finally, I added a double wrap of a knitted I-cord made from dark purple regular yarn for his scarf (the "1/4" sweater trim" on page 11 of the SU Holiday mini is actually I-cord!).

HERE is a video on how to make knitted I-cord (just use a tapestry needle to thread in the ends of your yarn).

HERE is a video for a crocheted I-cord (again just use a tapestry needle to thread in the ends of your yarn).

October 26, 2012

Forced Time Off!

On October 12th, I woke with the most tremendous pain on the right side of my lower back and pain radiating down the front of my right leg, just to my knee.  I've had this type of pain before, so I took muscle relaxers and laid around for almost two days.  Didn't help.  It got worse.  I literally could not walk without excruciating pain.

The only good thing about the trip to the emergency room was the two hours of pain relief.  After a trip to my doctor and an MRI, I was told that I had a herniated disc between L4 & L5, a bulging disc between L1 & L2, and a growth below L1 that was pushing against a nerve cluster.  What?  Really?  My doctor had provided me with anti-inflammatory and pain meds, but after a few days of being sick, I gave up on the anti-inflammatory!

So, the doctor made an appointment for me to see a neurosurgeon on November 13th.  At that point, it was 4 weeks away and I really was in tears.

I was able to get the appointment moved up to November 6th, which isn't far off now.  My daily goal has been to walk anywhere in my house without feeling crippled with pain!  I pay attention to when I eat and when I take a pain pill, or I end up sick.  I just want to walk from my living room sofa to the kitchen for a glass of water without assistance!

My dear sweet husband has his hands full:  working full time, working on 12 credits of college classes, and taking care of me.  He's kept up very well with laundry, cooking, and doing everything.  Thank you dear one!  Thank you also to Jamie, a dear new friend, who brought us the most delicious casserole and keeps checking on me.

Anyway, I have been forced to take some time off from creating anything.  I miss my craft studio, and I miss my life!  I am not used to being so idle.

I'm pretty sure I'm heading for surgery, I just don't know when.  I keep praying and trying to concentrate on anything but the pain.

Please keep checking back because as soon as I feel better, I will start posting again!

October 14, 2012

Girl's Birthday

This card has a lot of elements but was lots of fun to make!  The picture doesn't show the true color - the pink is bright pink.


A2 Card Base
White CS
Bashful Blue & Pink Passion CS (SU)
Foil Green Swirls Paper (DCWV)
It's Your Birthday stamp set (SU)
Card Chatter stamp set (CTMH)
Always in My Thoughts stamp set (SU)
Pink Passion, Old Olive, Chocolate Chip markers (SU)
Espresso Adirondack ink paw (Ranger)
Butterfly Ribbon (Made for Retail, Inc.)
Beautiful Wings Embosslit (SU)
Silver Stickles (Ranger)
White Opal & Flamingo Liquid Pearls (Ranger)
White sheer ribbon (JoAnn's)

October 13, 2012

Advent Calendar

I've been wanting to make this advent calendar since Kathy at Paper Phenomenon did her Ustream classes on it. I've been making so many cards lately that I'm sort of burned out on cards, so I jumped in with both feet. I still have some work to do on the "snow" area and probably some other stuff to add, and it is actually for Gary, who apparently has never had an advent calendar that he can remember! This is what I've gotten done so far:


October 12, 2012

Another Ornament!

I finally gave the ornament framelits and stamp set back to my SU Demo, Pam, who said I could keep them if I still wanted to use them, but, I bought my own set so now I can play anytime I want!  To top off my week, when Pam delivered my SU order she also gifted me a package of the Candlelight Christmas DP!  I was so surprised!  That's just Pam - she does that all the time - she's just the best and sweetest SU Demo ever!  Her only condition was that I had to make her an ornament out of it - not a problem!  (I forgot to take a picture of her ornament!)

Gary was feeling a bit left out - not a single "masculine" ornament in all those I made, so I hunted up some scraps of paper (literally!), and found some from last year's Graphic 45 collection (clocks on the fronts of these papers).  So, I got busy!  This is the "darkest" ornament I've made and the picture just doesn't show the details. So, here's Gary's ornament (which is now hanging in his college "study" room, aka man cave):


I think I'm addicted to making these ornaments!  As you can see - no ribbon or tulle!  This is not the ornament on the front of the SU Holiday Mini catalog, but my own version using four of the ornament dies.  I actually didn't have enough of the black print paper, so I used Michael's Kraft cardstock for the back two  cuts of the two largest ornaments.  It gives the ornament sort of a shadow effect.

Not ALL ornaments have to be for Christmas or frilly!